
.png)
Set up automated appointment booking pages with Emma.ai; gone are the days of back-and-forth emails trying to find a suitable time and place to meet!
Create your Meeting Page and share with colleagues/clients, allowing them to book a meeting with you directly. Setting up your Meeting Pages based on your preferences means you can have meetings when it suits you and you still maintain some control over your schedule.
Emma is the only product that lets you set up appointment booking pages with travel in mind. When you book a physical meeting with Emma.ai, your guest will only be able to choose times that do not conflict with your existing appointments and travel. Your guest will only be able to choose times that adhere to your scheduling preferences, such as maximum travel time. They can choose one of your locations (such as an office address) or their own location (such as their home address). Emma also supports virtual meeting appointments.
What is a Meeting Page?
A Meeting Page is a customisable, shareable web page which allows meeting attendees to book a meeting directly into your schedule. It’s designed to speed up meeting scheduling as it cuts out email ping pong. Anyone with whom you share the particular URL link (you can create a separate page for each separate meeting type you have) can choose a time and book the meeting, blocking out the time in both of your schedules.
Don’t worry though, you have control over what availability you offer when you create each page. You can set predefined conditions such as how much notice you require, whether you are free for an in-person or virtual meeting, how far you are willing to travel, what meeting software you will use, and what times you are free.
Set up video
This short video explains how to create your Meeting Page for both Virtual and In-Person Meetings, which is further explained in step-by-step instructions below.
Setting up your Meeting Page
Step One: Create your Meeting Page
To create a new Meeting Page, head to the ‘My Meeting Pages’ tab under the ‘Appointments’ menu in the sidebar. Then simply select ‘Create new Meeting Page’.

Add your meeting name
You’ll be asked to specify what type of meeting this Meeting Page will be used to organise. Assign a title so that to help people book in for the right type of meeting with you.
For example it could be that you’re organising a sales demo meeting, or a client visit. There’s no right or wrong, it’s just so that it’s clear to you and to the person who will be booking the meeting.
Your customisable link to your Meeting Page
The Meeting Page URL will automatically have the name of the meeting as the “slug”. You can manually overwrite this though if you’d prefer to customise your link. This is the link that you’ll ultimately share with your meeting attendees at the end, so make sure it's something that will make sense to all parties.
You can also customise the first part of the URL in the URL settings page. This means rather than it listing your email address, you could choose for it to show your name instead.
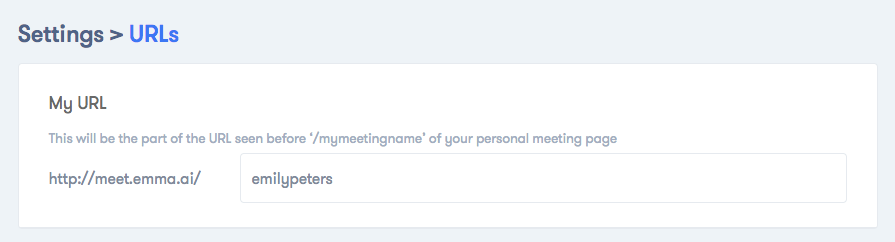
The Meeting Page URL would then look like this:

Add a quick introduction
Next you have the option to add an introductory message to the recipient; this gives you the opportunity to clarify the purpose of the meeting and again to inform your client or colleague what the meeting page is to be used for.
Set the meeting duration
Lastly, you can specify how long you’d like the meeting to be. This is especially important when you’re giving the recipient free reign to select a time and location. This enables you to only offer up the amount of time that you have free for this particular meeting. Then they will only be able to see time slots on your calendar that will cater for this length. You can either choose from the predetermined meeting durations, or in the ‘custom min’ field you can enter the duration of your choice.
Step Two: Specify if a Virtual or Physical Meeting
Once you’ve finished entering the Meeting Page details and have clicked next, you’ll be given options surrounding the location of the meeting. You can specify either a virtual meeting or physical meeting.
Virtual Meetings
Firstly you can choose whether this meeting will be taking place virtually or in-person.
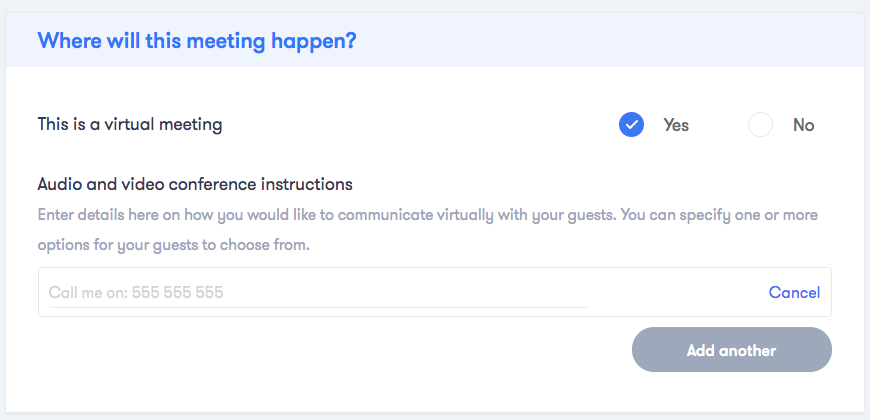
Selecting ‘virtual meeting’ will then prompt you to specify how the recipient should contact you; you can add a link to a Zoom meeting room, leave your phone number, or whatever method of communication you would prefer. If you add more than one option, your guests will be able to choose whichever they prefer.
Physical Meetings
You can also choose to use this Meeting Page to schedule an in-person or physical meeting. This requires some different information regarding locations.
You have the option to allow meeting attendees to specify a location for the meeting themselves, and/or choose a location that you have suggested yourself, such as your work premises, meeting space, or your favourite coffee shop. You can add multiple suggested locations by typing in the address, or by entering the Base name if it’s a location you have already saved as a Base.
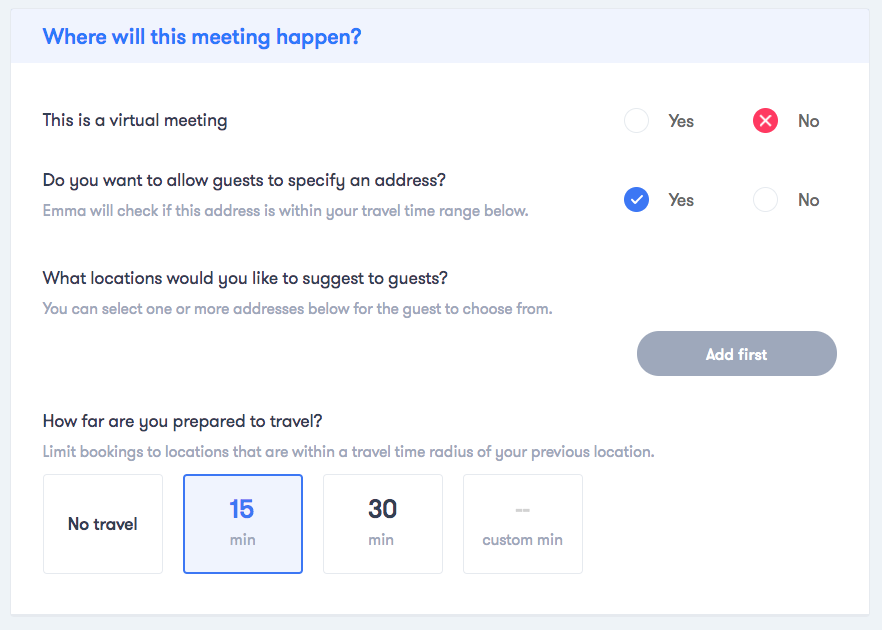
In order to protect your time and schedule, you have the ability to specify how far you are willing to travel for this particular meeting, which will determine which locations meeting attendees are able to request. This way you aren’t giving up full control and you can still ensure this meeting works within the rest of your schedule.
The travel time is calculated between your last known location or Base and the location specified by the attendee that is making the booking. Emma calculates travel time from the closest of these locations.
Please note that the travel limit is based on driving time only as other transport modes are not supported by Emma’s Meeting Pages currently. We are working on this and plan to introduce support for additional transport modes in the future.
Step Three: Choose your availability
You can now specify what availability you would like to offer for this meeting. Customise the time periods on each day by clicking on the time you’d like to change and selecting the relevant time. This means that your calendar will only show availability during these selected times for this particular meeting.
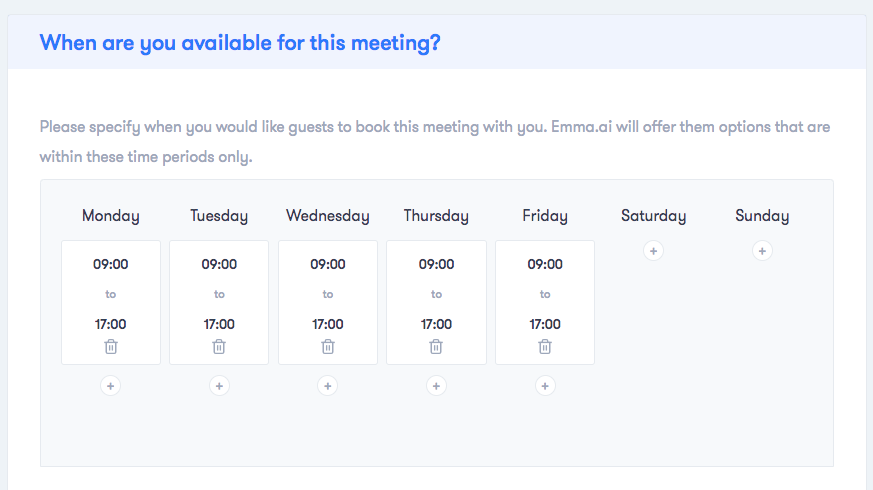
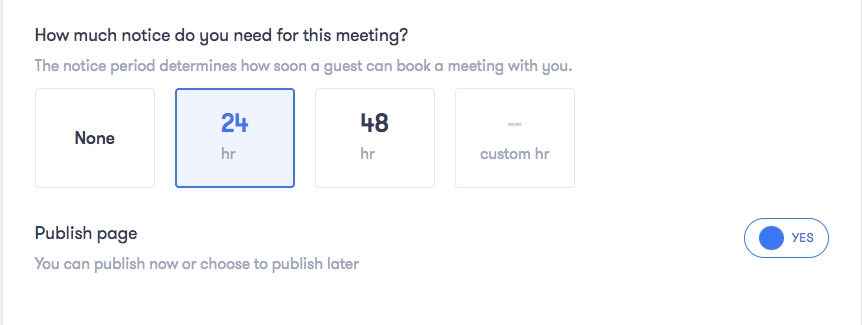
Finally, you can determine how much notice attendees will be required to give you when scheduling this particular meeting.
You can select either ‘none’, ‘24 hours’ or ‘48 hours’ notice by clicking the relevant button, or customise a specific notice period by clicking the ‘custom hr’ button. This means that meeting attendees will only be provided availability that allows for this notice period. For example, if you set a notice period of 24 hours, the attendee will not be able to book an appointment with you until at least 24 hours from the current time they are making the booking.
These handy features help Emma.ai to protect your time and enable you to maintain control over your calendar, whilst benefiting from time-saving appointment booking automation, without a series of back-and-forth emails and tedious manual travel time planning.
Step Four: Share your Meeting Page link
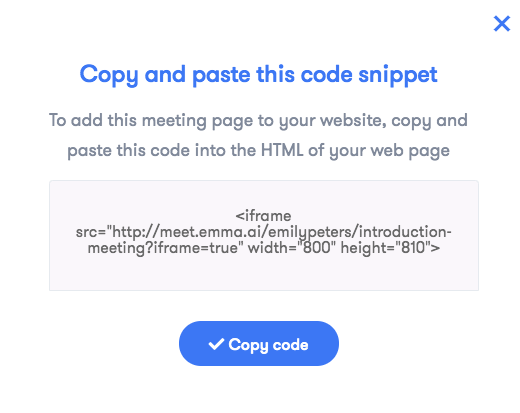
To publish your page instantly, set the ‘Publish Now’ toggle as ‘Yes’, press ‘Save Meeting Page’ and your page will be live! You can then copy the link and distribute to potential attendees, safe in the knowledge that your customised conditions will have to be met in order for them to book the meeting.
It’s up to you how you share the link; you can either email it to all relevant attendees, add it to your email footer, or embed it on your website using the code snippet provided. The possibilities are endless!
You also have the option to duplicate this Meeting Page so you don’t have to create a new one from scratch. This will copy all details exactly. It’s perfect if you have similar types of meetings and need to set similar conditions to each meeting page.
Step Five: A meeting has been booked
When someone has booked a meeting via the Meeting Page link you shared, you will receive a confirmation email, detailing the meeting location, attendee, time and date:

Emma will then automatically schedule the meeting in your chosen calendar:
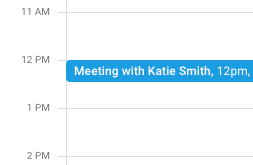
Your calendar is now fully up-to-date!
Now it’s your turn
Save yourself time and energy by setting up your Meeting Page. We hope you love it! Sign up for your free trial - no credit card required - here. Or if you're already an Emma.ai user, you can login here.
Let us know how you get on, or if you have any queries or feedback; simply drop us a message via hello@emma.ai. You can also get in touch with us via any of our socials, so if you aren’t already following us, head to our Facebook, LinkedIn and Twitter pages and say hello!
For help on any of Emma’s other brilliant features, check out our how-to guides and videos here.