

Have Emma automatically add accurate travel time to your calendar when scheduling a meeting.
Emma adds travel to and from the events in your calendar based on the locations in your calendar events and Emma’s understanding of where you are likely to be at any given point.
The starting point for any journey is determined by your previous known location, which could be a previous calendar event or one of your Bases.
How does Emma understand locations?
Events that you add to your calendar have a Location field. Emma analyses this field to understand if it is a physical location or virtual location. The clearer the location is to you, the clearer it will be for Emma to understand.
Sometimes Emma may not understand an address but you can fix this. For example, If you have a booking in your calendar for a location called “Hospital” it will be difficult for Emma to understand what particular hospital this will be. You can either update the location address to make it more informative or you can go to your Location Settings to let Emma know that when it sees “Hospital” it actually means a particular hospital address.
When does Emma add travel time?
When you first connect your calendar, Emma adds travel time to all future events in your calendar for the next 3 months. This can take a while!
When a new calendar event is added to your calendar, either directly by you, or through an invitation, Emma will add travel time straight away. Travel time is also updated whenever you update an existing event, such as by changing its time or location.
It typically takes a few seconds for travel time to appear in your calendar but it can sometimes appear to take longer if your calendar is not refreshed frequently.
Emma adds travel time for all events in the next 3 months in your calendar. At the beginning of every week, travel will be added for any future events that are now within this 3-month window.
What is a Base?
Bases are the locations at which you regularly spend time. These could include places such as your home, your office, a local cafe or a shared work space that you often work from. Emma uses Bases to understand where you frequently travel to and from.
You can have multiple Bases saved in your Emma account; typically your first Base is the place from which most of your journeys start, and Bases thereafter would be the places you frequently travel to.
What travel time can Emma help you with?
When adding travel time to events, Emma calculates how long the journey should take at the time of adding an event. It’s important to note that Emma does not take into account real-time traffic, and won’t notify you if the travel time changes but we’re working on this and it is something we want to do in the future. So it’s always worth checking the latest traffic info before leaving for an event.
Emma helps you to book out your travel time so you can plan ahead without repetitive travel planning and risk of getting under-booked, over-booked or double-booked. We support four travel modes: driving, cycling, walking and public transport.
Set up video
This quick video shows you each of the steps required to set up travel time within Emma.ai. Keep reading for detailed instructions!
Setting up travel time for Emma.ai to add automatically
Step One: Add your Bases
To show you how Emma works, we will first set up our Base.
To configure your Bases simply head to the ‘Bases’ section within the Settings menu, then start to add your Base:
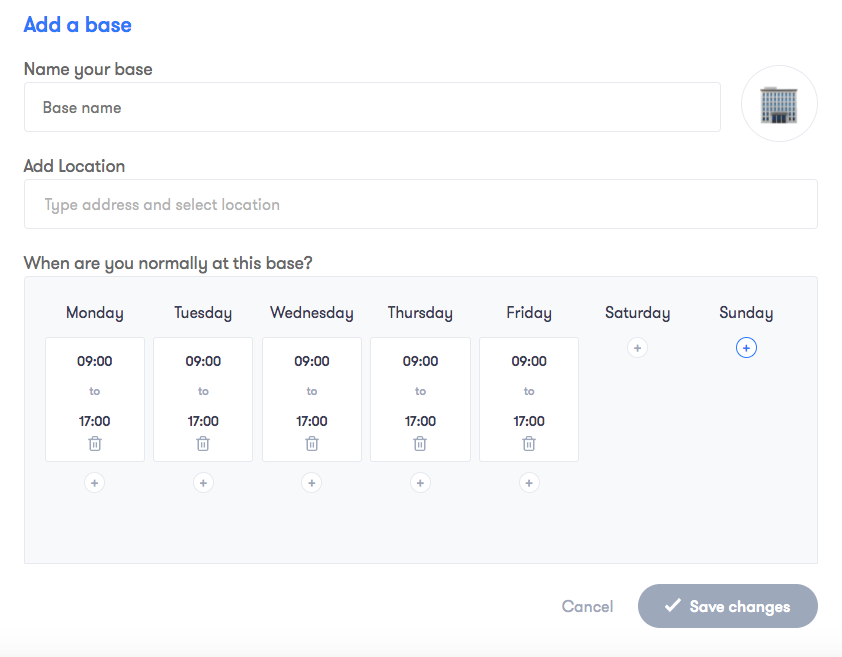
Here you’ll start by identifying the Base; assign a name and enter the full address details so Emma knows its location.
For our working example we will be adding a ‘Work’ Base, located at The Shard, London, and a ‘Home’ Base located at One Hyde Park, London.
You then have the option to specify during which time periods you’re typically at that address.
For example if it’s a work address you could enter your normal working hours, and if it’s a home address then weekends and evenings may be more appropriate. You can click the ‘+’ button to add an additional time period for each day if you require.

Step Two: Select your Travel Preferences
Head to the ‘Travel’ section of ‘Settings’ to set your travel preferences if you didn’t do this when you signed up or if you need to change them.
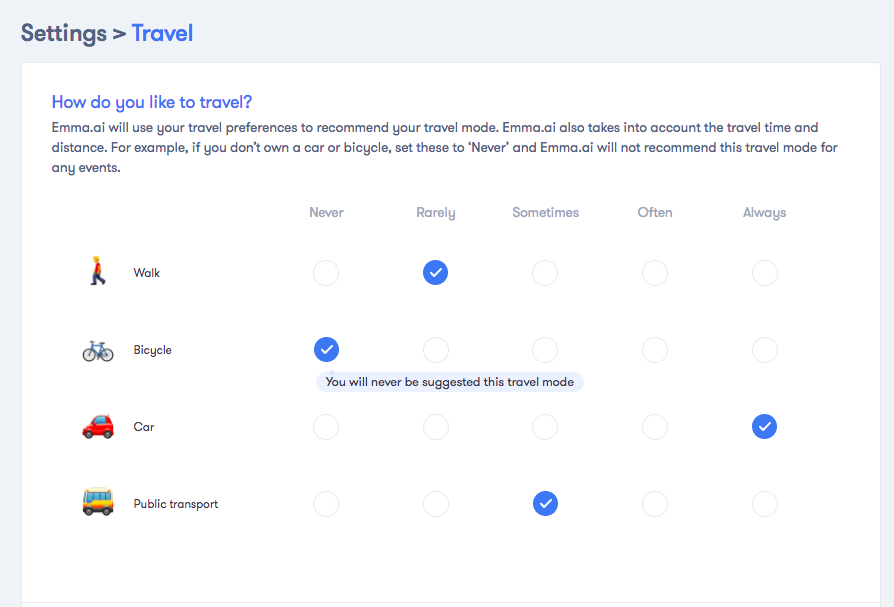
Initially Emma will ask you to specify which methods of transport you prefer. You can rate these based on your frequency of use. Emma will not include transport modes for which you select ‘Never’’. Emma will not use multiple transport modes and combine different selected ways to travel. It will choose the most suitable travel mode based on the travel time for a particular journey.
Add Travel Buffer Time
Within travel settings you also have the option to add ‘Travel Buffer Time’.
Note: this is different to ‘Buffer Time’ which is unrelated to travel time and is designed to help you manage your calendar. You can learn more about this buffer time here.
Travel Buffer Time is designed to add in some extra time when travelling, maybe you want to avoid being late, add time to find a good parking spot or want to catch up on some work before your meeting.
The addition of Travel Buffer Time does not affect Emma’s travel time calculation; this will simply be added on top. You can specify how much Travel Buffer Time you want Emma to add by pressing the ‘+’ button until you reach the desired time.

Specify Travel Calculation Requirements
Return journeys

By default Emma will not calculate return journeys when scheduling meetings, but this can easily be enabled by ticking the ‘Yes’ box. What this means is that when you schedule a meeting in your calendar and add the travel time, Emma will also automatically calculate how long the journey would take to travel from the meeting location, back to your current Base.
Regular journeys

You have the option for Emma to add regular journeys to specific saved Bases. This is useful when you are regularly commuting from one Base to another, such as from home to work.
Turn travel time on and off

You can turn on and off travel time at any time. Leaving this setting enabled as it is by default means that Emma will add events to your calendar which include travel instructions and duration, based on the calculations you have requested in the section above.
This means that your calendar is automatically updated to reflect the entire time a meeting will require - including the travel time to and from, as well as the duration of the meeting itself. All hail accurate schedules!
Choose a calendar to add travel time to

You can choose the particular sub calendar where you want travel time added. You may want to use the Emma.ai sub calendar, your primary calendar or another shared sub calendar. Most frequently, Emma customers choose their primary calendar as this is the one they share with their colleagues and they want to make sure that their travel time is booked out correctly for them to see.
Travel Time in Action
In our example, we have a dinner booked at 5.30pm on Friday at The Ivy in London. Emma has calculated travel time from our saved Work Base of The Shard (where we specified we would be until 5.30pm), and added travel time back to the One Hyde Park ‘Home’ Base because we specified that we are at that location from 6pm onwards during weekdays. It is displayed in our calendar as below:
.png)
See for yourself
Why not give it a go for yourself and start scheduling meetings with Emma.ai - the only tool to add accurate travel time when organising events. You can sign up for your free trial - no credit card required - here. Already an Emma.ai user? You can login here.
If you’re already onboard then we would love to know how you get on with the travel time feature. All questions and feedback are welcomed at hello@emma.ai!
Be sure to follow our social media accounts - we’re on Facebook, LinkedIn and Twitter - to be the first to know of any updates or news.
For help with any of Emma’s other brilliant features, we have additional how-to guides and videos available right here!